
| The
Backup Job: Always be prepared! |
||
| The “” window is the first step in Normal backup mode, here you have two sets of options: | ||
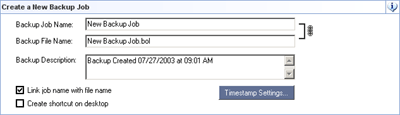
| 1- Create a New Backup Job: | ||
| A-
Backup Job Name: Enter a name of the backup job you intend
to create. B- Backup File Name: If you want, you can assign a different name to the actual backup file. If you choose to backup your data without compression, the backup file name will be assigned to the folder that would contain the uncompressed data. More Info: C- Backup Description: If you want, you can write
a description of the backup job. E- Timestamps Settings: This dialog will allow you to include date and/or time in the backup file name. One of the benefits of this new feature is that it prevents the accidental overwriting of previous backup jobs in case the default backup job name was chosen. To prevent backup jobs from accumulating and taking up too much space, you can also choose to purge old backup file according to number of backups or by time passed since the backup job was created. This is most helpful when scheduling backup jobs. More Info: F- Create shortcut on Desktop: Check this checkbox if you wish Genie Outlook Backup to create a shortcut for the backup job in the desktop area. |
|
|
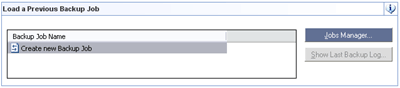
| 2- Load a Previous Backup Job: | ||
A- Backup Job Name: You can select a previously created backup job to use the same settings of that job, or you can choose the “Create new Backup Job” item to create a new backup job. B- Jobs Manager: This dialog allows you to organize your backup jobs More Info: Press the "" button to go to the “” window |
|
|
|
|
||
| Built in Monday, June 24,2003 |